
How ppline Keeps Bulk Products Stable Before Palletizing
At a Russian bulk-products plant, the real bottleneck is often not filling itself. It is the unstable handoff between bag alignment, accumulation, discharge, and the palletizing area. This layout solves that last meter with a modular secondary bagging line, a large-bag gripper, and a controlled conveyor path.
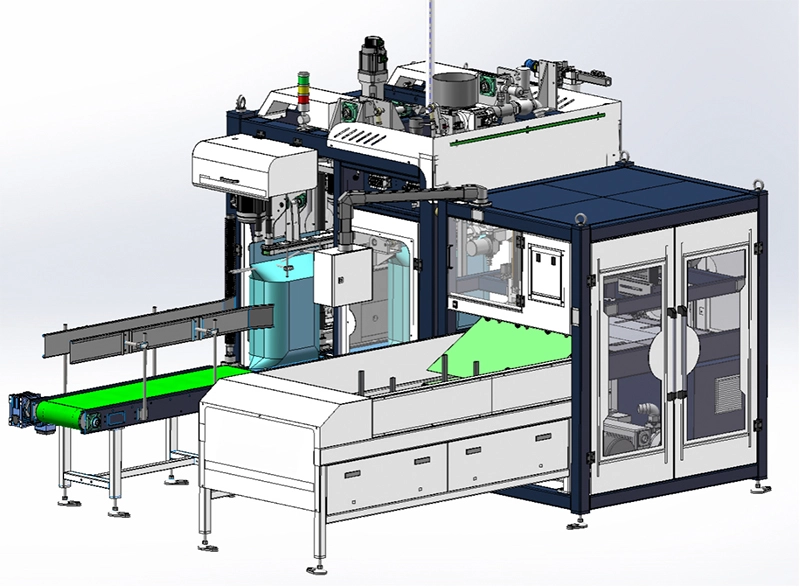
Scene: when a good fill still fails at the transfer point
The customer scenario is simple to describe and hard to run well: bulk products leave the packing point, but the bag is not yet ready for a clean handoff to the next station. If the bag mouth drifts, the load shifts, or the conveyor rhythm changes, operators start correcting by hand. That slows the line, adds rework, and makes the palletizing area the weakest point in the system.
The CAD view of the bag magazine and placing arm shows why this matters. The system is not just filling a sack; it is controlling how the bag is picked, held, aligned, and released so the next move stays predictable. For a plant running mixed bulk products, that control is what keeps the line stable when throughput rises.
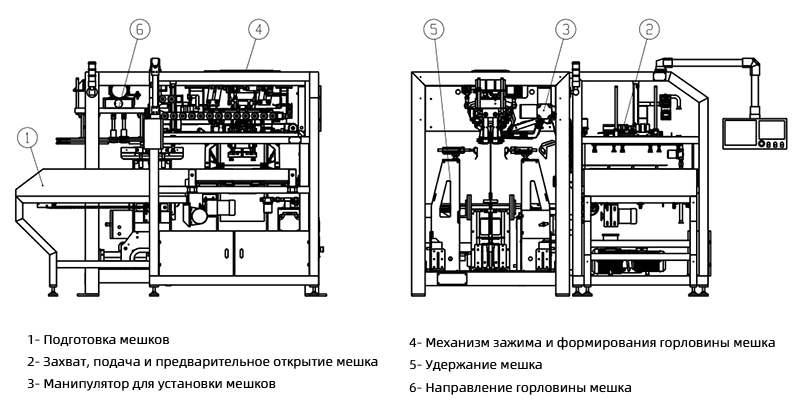
When bags leave the packing station with uneven spacing or a drifting mouth position, staff must keep touching the load. That is where speed disappears and consistency breaks.
Why the ppline layout fits the job
The reason this line fits the application is structural, not cosmetic. The accumulation belt creates a buffer so upstream flow does not crash into the discharge point. The large-bag gripper keeps the sack square while the machine completes the handoff. The discharge conveyor then carries the load away with a cleaner spacing pattern, which is exactly what a palletizing area needs.
The elevated steel frame and enclosed cabinet also matter. They separate the working zone from the transfer zone, keep the machine layout compact, and make the whole line easier to read for operators. In a bulk-products plant, that kind of physical order is what turns a busy packing area into a repeatable process.
bpmpack Engineering Insight: The real gain is not just higher output. It is a controlled bag path: accumulate, square, release, and hand off on one frame. Once those four actions are stable, the palletizing area stops being the place where the line loses time.
What the structure proves in practice
The two images together show the same idea from different angles. One view highlights the modular secondary bagging structure with the accumulation belt, gripper, and discharge conveyor. The other view shows the bag magazine, placing arm, and alignment logic that keep the transfer point under control. That is the evidence a bulk-products line needs before it commits to a layout.
For a customer moving from manual correction to a more stable workflow, the result is straightforward: fewer hand touches, fewer bag-position errors, and a cleaner path into palletizing. The line is not forced to rely on operator attention to stay straight. The machine geometry does the work.
| Observed issue | Structural answer | Operational result |
|---|---|---|
| Bag drift at the transfer point | Bag magazine and placing-arm alignment | Cleaner bag position before release |
| Flow congestion before palletizing | Accumulation belt and discharge conveyor | Smoother spacing between loaded sacks |
| Frequent manual correction | Elevated frame and enclosed working zone | More repeatable line behavior |
Need a stable handoff for your bulk-products line?
Talk to BPM if you want a layout matched to your bag size, target throughput, and palletizing rhythm. We can help you place the transfer point so the line stays steady before the last lift.
Request a line layout review English
 Русский